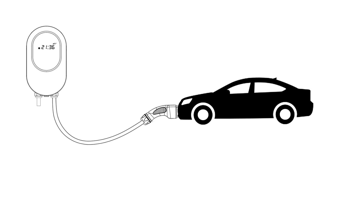
ANC-Serice
Charging that is fast, high-quality,
and dependable
ANC-Serice
Charging that is fast, high-quality, and dependable
Installing Your ANC EV Charger has never been easier
Note: In some/all regions, it is imperative to get city’s approval for installation in case additional wiring or circuit breaker changes are need. Please check with your Hydro supplier before installation.

Drill the necessary holes at a suitable location

Connect the charger to the main phase

Download app & Configure

Start Charging
Download Guide for detailed instructions
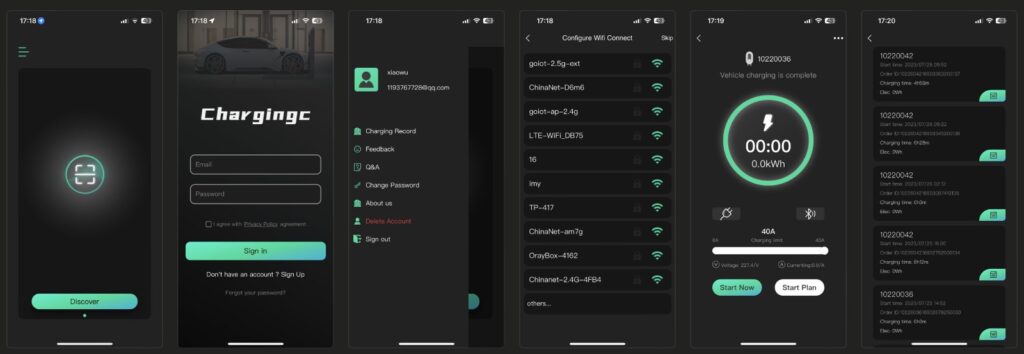
To configure your ANC EV Charger, Download ChargingC app available on Apple Store or Google Play.
To configure your ANC EV Charger, Download ChargingC app available on Apple Store or Google Play.
CONTENTS
- 1. IMPORTANT SAFETY INSTRUCTIONS.
- 2. PRODUCT INTRODUCTION.
- 3. ACCESSORIES.
- 4. TOOLS FOR MOUNTING.
- 5. PLAN THE MOUNTING.
- 6. MOUNT THE CHARGER.
.
- 7. WIRE THE CIRCUIT.
- 8. OPERATE THE DEVICE.
- 9. THE DIGITAL SCREEN.
- 10. SMART APP GUIDE (OPTIONAL).
- 11. FCC STATEMENT.
- 12. WARRANTY AND MAINTENANCE.
1. Important Safety Instructions
1.1 Warnings & Cautions
WARNING: To avoid fire, injury or death, read and follow the instructionscarefullyduring installation, operation and maintenance.
DO NOT put fingers into the electric vehicle connector.
DO NOT use this product if the power cord or EV cable is frayed, insulation-broken,orany other signs of damage.
DO NOT use this product if the enclosure or the EV connector is broken, cracked, open,or shows any other indication of damage.
DO NOT remove cover or attempt to open the enclosure because of risk of electricshock.
WARNING: This device should be supervised when used around children.
WARNING: This device must be grounded.
WARNING: To avoid the risk of fire or electric shock, do not use this devicewithanextension cord.
WARNING: The suitability of the use of flexible cord in accordance withCEcode, partI,rule 4-012, is to be determined by the local inspection authority.
WARNING: To reduce the risk of fire, connect only to a circuit providedbranchcircuitover-current protection in accordance with the CSA C22.1–15 CanadianElectrical
Code, Part 1 (Canada) or NOM-001-SEDE Electrical installations (utility) (Mexico)orANSI / NFPA 70 National Electrical Code (USA).
Circuit Breaker Options table
| Output Amperage (A) | 16A | 32A | 40A | 48A |
| Circuit Breaker Options (A) | 20A | 40A | 50A | 60A |
1.2 Installation Requirements
WARNING: Disconnect electrical power prior to installing the chargingstation.
WARNING: Be sure to preview the user manual and ensure local buildingandelectrical codes are reviewed before installing the AC charger.
WARNING: The AC charger should be installed by a qualified technicianaccordingtothe user manual and local safety regulations.
CAUTION: Use appropriate protection when connecting to the main power distributioncable.
CAUTION: Type B, C or D breaker with the rating current for table shouldbeinstalledin the upstream AC distribution box.
CAUTION: Disconnect switch for each ungrounded conductor of ACinput shall beprovided by others in accordance with the National Electric Code, ANSI/NFPA70.
CAUTION: The device shall be mounted at height between 2 feet (600mm) and4feet (1200 mm) from ground. CAUTION: Please keep the charger in a clean area with low humidity. Not
recommended to be installed in coastal environments with high humidity or dust.
1.3 Daily Maintenance
CAUTION: Avoid moisture or water in the charger. If there is water or moistureingressin the charger, it is necessary to immediately power off to avoid immediatedangerandnotify the professionals to carry out maintenance before next use.
CAUTION: Please use the charger properly. Do not hit or press hard ontheenclosure.If it is damaged, please contact a professional technician.
CAUTION: Avoid placing the charger near hot objects and at high temperaturelocations and away from dangerous substances such as flammable gasesandcorrosive materials.
CAUTION: Do not put heavy objects on the charger to avoid danger.
Consignes De Sécurité Importantes
1.1 Avertissement & Mise En Garde Généraux
AVERTISSEMENT : Pour éviter les risques d’incendie, de blessure oudemort, il fautlire et suivre soigneusement les instructions pendant l’installation, l’utilisationetl’entretien.
– Ne mettez pas les doigts dans le connecteur du véhicule électrique.
– N’utilisez pas ce produit si le cordon d’alimentation flexible ou le câbleEVesteffiloché, isolé ou présentant tout autre signe de dommage.
– N’utilisez pas ce produit si le boîtier ou le connecteur EV est cassé, fissuré, ouvert ou montre toute autre indication de dommage.
Ne retirez pas le couvercle et n’essayez pas d’ouvrir le boîtier en raisondurisquedechoc électrique.
AVERTISSEMENT : Cet appareil doit être surveillé lorsqu’il est utiliséàproximitéd’enfants.
AVERTISSEMENT : Cet appareil doit être mis à la terre.
AVERTISSEMENT : Pour éviter tout risque d’incendie ou de choc électrique, n’utilisezpas cet appareil avec une rallonge électrique.
AVERTISSEMENT : L’adéquation de l’utilisation du cordon flexible conformémentaucode ce, partie i, règle 4-012, doit être déterminée par l’autorité d’inspectionlocalecompétente.
AVERTISSEMENT : Pour réduire les risques d’incendie, ne connecter qu’àuncircuitprotection contre les surintensités des circuits de dérivation conformément àlanormecanadienne CSA C22.1-15 Code électrique, partie 1 (Canada) ou NOM-001-SEDEInstallations électriques (Mexique) ou ANSI / NFPA 70 National Electrical Code(États-Unis).
Tableau Des Options Du Disjoncteur
| Courant De Sortie (A) | 16A | 32A | 40A | 48A |
| Options De Disjoncteur (A) | 20A | 40A | 50A | 60A |
1.2 Exigence Avant L’installation
AVERTISSEMENT : Assurez-vous de consulter le manuel d’utilisation et assurez-vousque les codes locaux du bâtiment et de l’électricité sont passés en revueavant
d’installer le chargeur.
AVERTISSEMENT : Débranchez l’alimentation électrique avant d’installer lastationdecharge.
AVERTISSEMENT : Le chargeur CA doit être installé par un technicienqualifiéconformément au manuel d’utilisation et aux réglementations de sécuritélocales.
MISE EN GARDE : Utilisez une protection appropriée lors de la connexionaucâblededistribution d’alimentation principal.
MISE EN GARDE : Un disjoncteur de type B, C ou D avec le courant nominal indiquédans le tableau doit être installé dans le boîtier de distribution CA en amont.
MISE EN GARDE : L’interrupteur de déconnexion pour chaque conducteur nonmisàla terre de l’entrée CA doit être fourni par des tiers conformément au Codenational del’électricité, ANSI/NFPA70. MISE EN GARDE : Cet appareil doit être monté à une hauteur entre 600mm(2pieds)et 1200 mm (4 pieds) du sol.
MISE EN GARDE : Veuillez conserver le chargeur dans un endroit propreet peuhumide. Il n’est pas recommandé de l’installer dans des environnements côtiersàfortehumidité ou à forte poussière
1.3 Entretien Quotidien
MISE EN GARDE : Évitez l’humidité ou l’eau dans le chargeur. En cas d’infiltrationd’eau ou d’humidité dans le chargeur, il est nécessaire de l’éteindre immédiatementpour éviter tout danger immédiat et d’avertir le personnel professionnel d’effectuerl’entretien avant la prochaine utilisation.
MISE EN GARDE : Veuillez utiliser le chargeur correctement. Ne frappezpasoun’appuyez pas trop fort sur le boîtier. Si le boîtier est endommagé, veuillezcontacterun technicien professionnel. MISE EN GARDE : Évitez de placer le chargeur à proximité d’objets chaudset àdesendroits à haute température et loin de substances dangereuses telles quedesgazinflammables et des matériaux corrosifs.
MISE EN GARDE : Ne placez pas d’objets lourds sur le chargeur pour éviter tout
danger.
2. Product Introduction
CAUTION: Avoid placing the charger near hot objects andat hightemperature locations and away from dangerous substancessuchasflammable gases and corrosive materials
2.1 Basic Interface

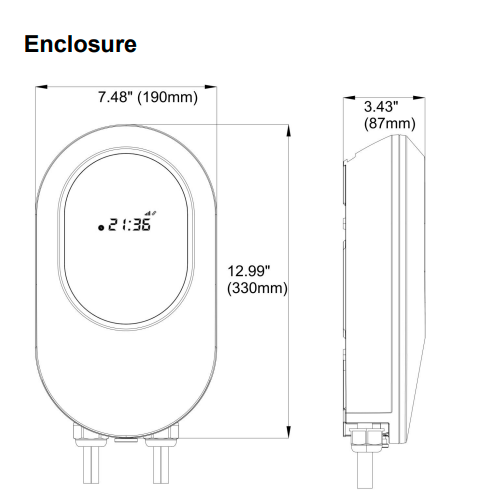
2.2 Basic Dimension

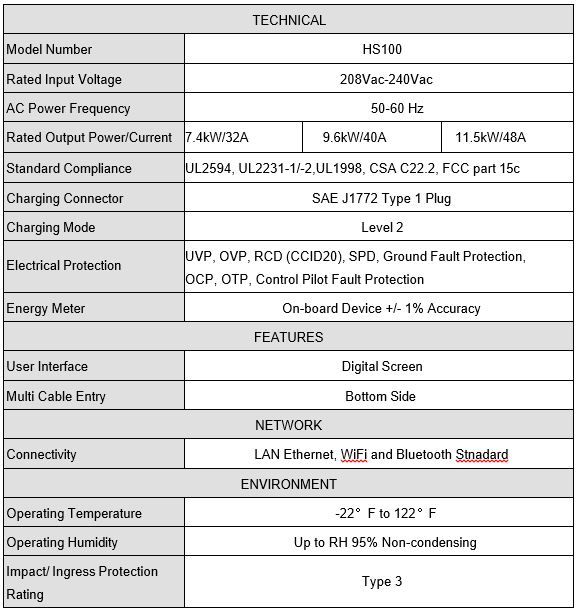
2.3 Specifications

2.4 Design Standards
UL 2594: Electric Vehicle Supply Equipment UL 2231-1: UL Personnel Protection Systems for Electric Vehicle (EV) Supply Circuits: General Requirements
UL 2231: Personnel Protection Systems for Electric Vehicle (EV) Supply Circuits: Particular Requirements for Protection Devices for Use in Charging Systems
UL 2251: Plugs, Receptacles and Couplers for Electric Vehicles UL 62: Flexible Cords and Cables
UL 991: Tests for Safety-Related Controls Employing Solid-State Devices UL 1998: Software in Programmable Components
NFPA 70 Article 625: National Electrical Code, Electric Vehicle Charging System UL 840 (Clearance and Creepage)
3. Accessories
Check the box to ensure you have this installation guide and these parts:
.
.
.
.
.
.
.
.
.
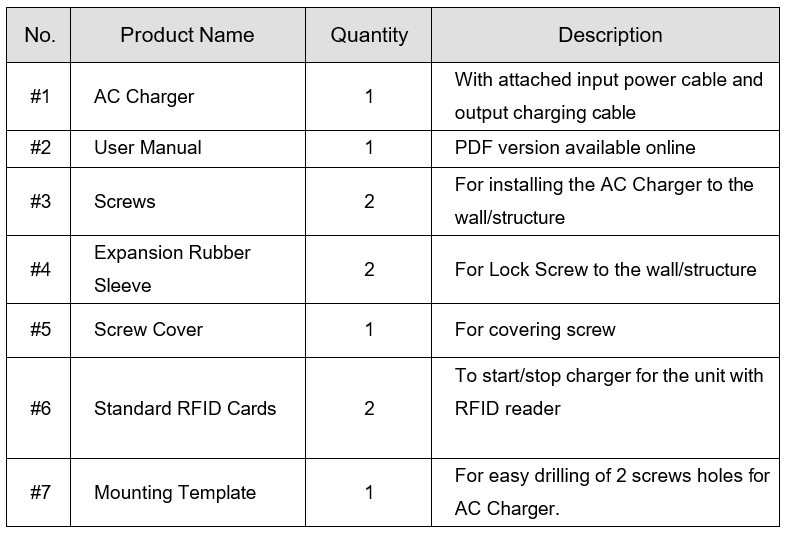
Note: If you are missing any of these parts, please contact us.
4. Tools for Mounting
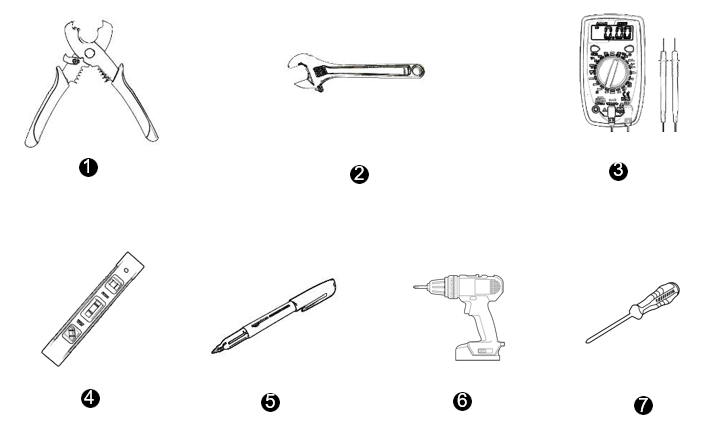
Tools required before installing the Wall-mounted charger, gather the following tools:
1.Wire stripper
2.Adjustable wrench
3.Voltmeter or digital multi-meter (for measuring AC voltage at the installation site)
4.Level
5.Pencil or marker
6.Drill
7.Phillips screwdriver
5. Plan The Mounting
WARNING: In areas with frequent thunderstorms, add surge protection at the service panel for all circuits. Ensure all power and
ground connections, especially those at the breaker and bus bar, are clean and tight.
STEP 1
Select the appropriate mounting location with electrical capacity:
I. Ensure the owner has chosen a mounting location that allows the charging cable to reach the car’s charging port while still providing slack.
II. The device must be anchored on a solid wall or a stud with the dimensions: 3.15”(80mm) x 5.118”(130mm).
III. The device shall be mounted at 47.244” (1200mm) height from ground.
STEP 2
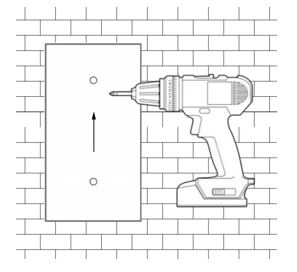
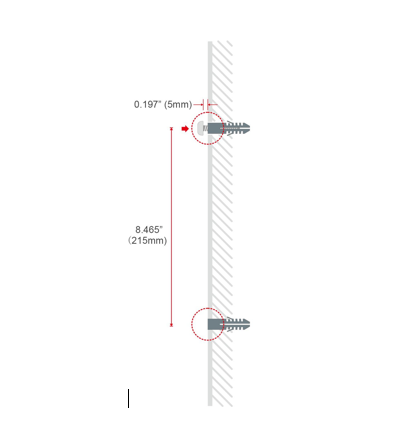
Drill 2 Screw Holes with a diameter of 0.472”(12mm) and a depth of 2.244”(57mm) by using #7 mounting template. Please drill screw holes in the direction of the template arrow
6. Mount the Charger
STEP 3
Nail #4 two expansion rubber sleeves into the holes and nail #3 one screw to the top expansion rubber sleeves. The distance between the cover of the screw and the wall is about 0.197”(5mm)
STEP 4

Align the rear notch of charger with the holes and hang the top notch on the top screw, fit the #3 screw to the bottom hole.
STEP 5

Cover the screw with #5 screw cover.
STEP 6

Fix the inside cover on the charger with two screws and fasten the outside cover.
STEP 7
Overall outlook after installation.

7. Wire the Circuit
WARNING: This device must be grounded. Disconnect electrical power prior to installing the charging station.
WARNING: Improper connection of the equipment-grounding conductor would result in a risk of electric shock. Check with a qualified electrician or serviceman if you are not sure whether the product is properly grounded. Do not modify the plug provided with the product – if it doesn’t fit the outlet, have a proper outlet installed by a qualified electrician.
CAUTION: Use appropriate protection when connecting to the main power distribution cable.
STEP 8
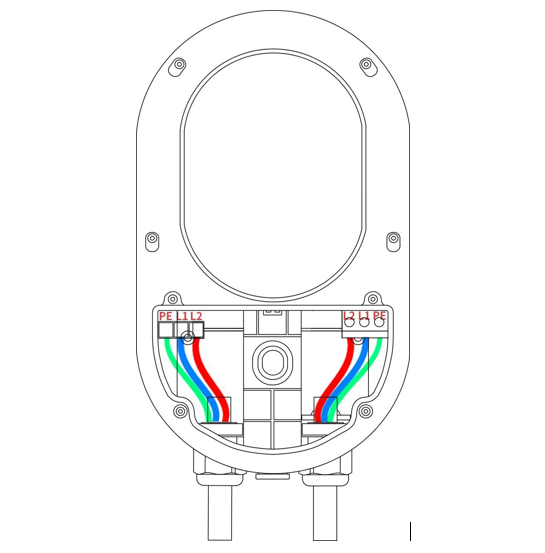
For the safety purpose, please set circuit breaker protection in the input part of EV Charger. Please follow the instructions below:
For Single Phase
Connect the L1 lead to the grid L1, connect the L2 lead to the grid L2, connect the PE lead to the grid PE.
|
16A | 32A | 40A | 48A | |
|
20A | 40A | 50A | 60A | |

